 |
| this is our starting image, before processing. |
You know how they always say gear doesn't matter? Well, if you've ever tried shooting sports or events, you'll have found out that it does matter, quite a bit. Deep-space astrophotography is the same way. To do serious astrophotography of that sort, you need a telescope or a supertele lens, a camera with a good sensor, and most important of all; a tracking mount. A tracking mount is, essentially, a heavy-duty tripod hooked up to a computer that is aligned to the north or south pole (this is known as polar alignment). Those babies run around $700 for a cheap one worth its while. You can build your own Equatorial mount, which is designed to spin the camera/telescope at the same rate of the Earth's rotation, for about $100; however they aren't very good for high-magnification (resolution) shooting because of their inexact nature. Both of these will let you shoot extremely long exposures; from 30s to several minutes per frame without issue, but the former is expensive and the latter isn't the best (sharpest) there is.
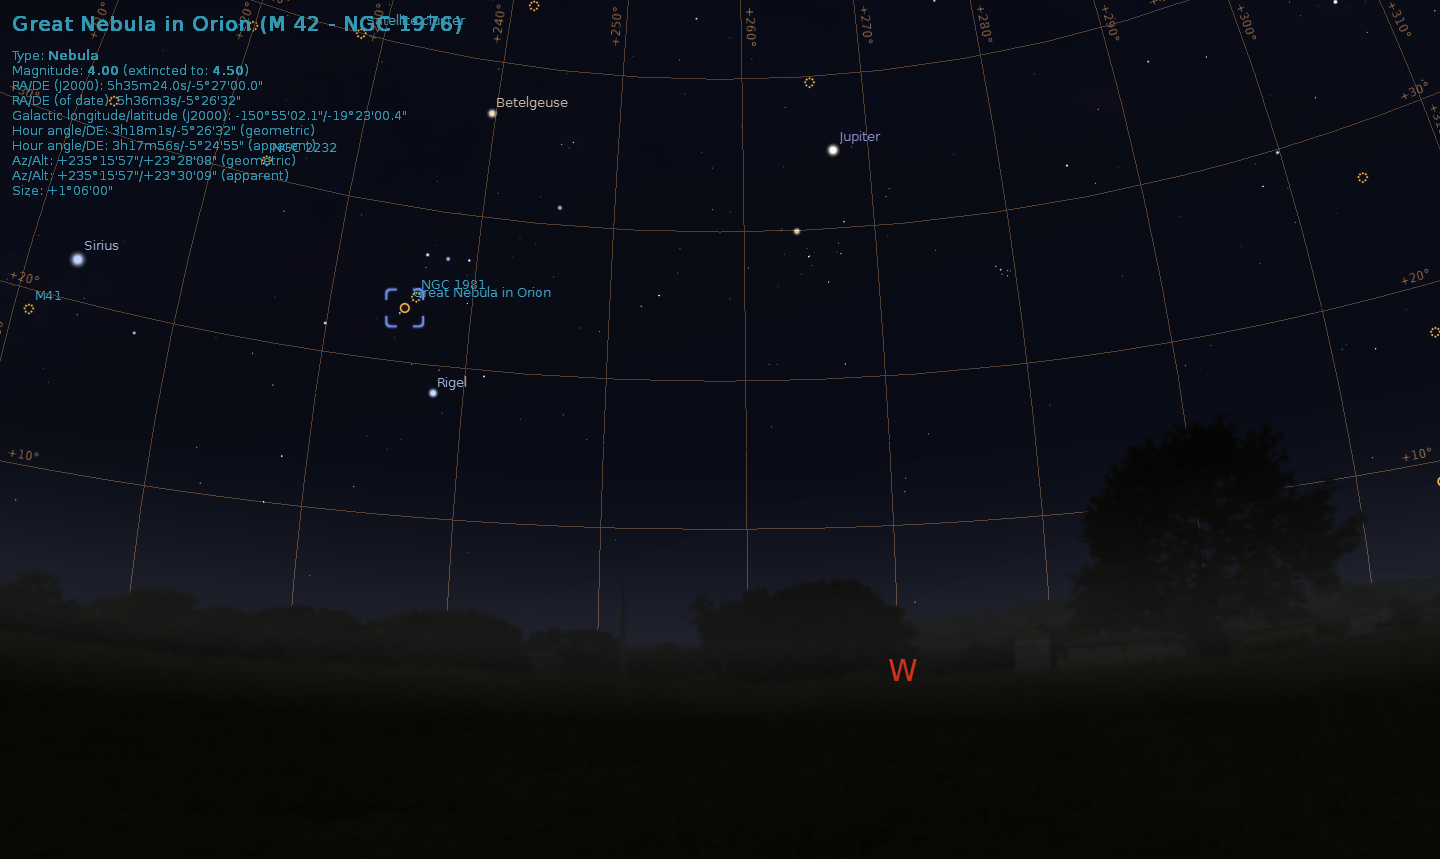
That leaves us with fixed tripod shooting, which severely limits our shutter speeds. The rule is 600 / focal length · crop factor to prevent rotational blur, since the earth spins on its axis 24 hours a day, 7 days a week. This isn't a hard rule, and you can experiment to figure out just how long you can shoot for on a given night, but it holds true most of the time. Now, astophotography from a fixed tripod is a battle between magnification and exposure time, since to get a higher resolution image, you must use a longer lens. The above frame (it's not a finished image, we'll call it a frame) was taken at 300mm on a 1.5x crop body. Now, step one is to break out this awesome program known as stellarium and find what you're after in the night sky. In my case, that looks like this:
 |
| peering out into the night sky at M42 with stellarium. |
Using stellarium, we find our object, the nearest cardinal direction, about how high it is above the horizon, and other stars and Deep Sky Objects (DSOs) of note nearby to help us find it at night. Once we've located it, step two is to make a plan (once you've done this a time or two, this step isn't really necessary). In our plan, we need to gather every piece of information we can. Mine looks like this:
- Ideal shooting time, day/month/time, you can preview any moment of time in stellarium
- 4/6/13 at about 9:45pm
- What the weather is like at that time (very important)
- Clear skies!
- Equipment:
- Nikon D5100
- Tamron 70-300mm f/4-5.6 VC USD
- Manfrotto 055xprob
- Manfrotto 410 geared head
- Location/travel time and level of light pollution:
- My backyard
- 6.8-7 on the bortle scale
- Frame ratios, light/dark/bias, and if you need to reframe the target to finish capturing lights.
- As many lights as possible (265)
- A good number of darks: 50
- Twice as many bias as dark: 100
- post-processing workflow:
- Shoot
- Deep Sky Stacker (DSS)
- Star Tools
Now, that's a lot of technical jargon, so let me explain some things before we get all confuse and quit. In order to shoot DSOs from a fixed tripod, we need dark skies. I'm lucky enough to live in a nice, rural place with dark skies, so I don't have to travel far. Here is a superb map of dark sky locations across much of the western hemisphere, US readers can use it to figure how far they might have to travel. Now, to image DSOs like M42 (which is the Orion Nebula, by the way) at a high magnification is going to take your longest lens, unless you have something longer than 300mm on crop (450mm equiv), at which point you can't possibly get long enough exposures. Ideally, I'd like a 200mm f/2.8 lens (6x as much light can be gathered), or a 200mm f/4 lens (4x as much light), but this is what I have to work with. Next up, frames.
Stacking is the process we use to reduce noise (and boy does it reduce noise a lot), every time we double our number of light frames, we halve the noise. That means that with my 265 light frames alone I have already cut the noise down to around 1/16th the level it was already at, but we're not done yet. Dark frames are used subtractively to cut down on the noise produced by the conditions shot in. These include: exposure time, sensor heat, sensor model, firmware,and sensor amp noise. You take them by simply putting on the lens cap and taking exposures just as you would light frames. Using 50 of these we further cut noise levels, but we're still not done. Next come bias frames, or frames at the same ISO, with lens cap on, at the fastest shutter speed, and if you're anal about it minimum aperture. There is no possibility of there being true signal in a bias frame, so everything in it can be subtracted as noise. We do all of this in DSS, which is free, or Registax, or any other stacking program. After that we produce an output and edit it in other software, I use StarTools because it's very inexpensive and very powerful. But first we have to shoot our data...
 |
| just imagine it's nighttime. |
First you put the camera on the tripod, obviously, lens attached, and with hood on to prevent flare and reflections from the moon. Ideally, the lowest tripod height is most stable, but I'm not about to get crouching down for it if it might not matter. Once you get your camera all set up on the tripod and everything, and have found the object, you get to spend several minutes focusing. Infinity marks on autofocus lenses are not accurate, and you will need to use high magnification live view and manual focus to get it just right, remember to disable any image stabilization. After you focus and have dialed in your settings,
 |
| missing SD card, boy oh boy it's like you're right there when it was done! |
(By the way, if you don't shoot this in RAW, forget about it), you get to start shooting. If you camera is a Nikon, you have an intervalometer built in and can just configure it like this:
 |
| 300 frames, 1sec between each frame. |
If you shoot Canon, Pentax, Sony, or anything else you'll have to see if you have an intervalometer, if not use something like EOSUtility or other software to automate capture, or do it manually... in the cold... You must use a remote to avoid causing shake to do this. Once we've captured our images we get to stacking:
 |
| click to magnify. |
Holy crap! That's not the screen you start with at all! I've gone ahead and done some stuff and will assume you're smart enough to open your files correctly. First, after importing light frames I went ahead and checked all of them, DSS doesn't check them all by default because there might be some duds. Then I used the tool very top right to adjust the gamma curve the preview adheres to to make M42 more visible (it's in there, I promise), and lastly I used the top tool on the right to draw the output box, we don't need the extra black space. From there, I registered the files, so DSS can find the stars and offset amounts. However, because my data is very dim, I need to use a more aggressive star threshold:
 |
| "register settings" is in the bar on the left. |
 |
| click stack on the left, then advanced settings. |
Because I have so many light frames, I can use the Median Kappa-Sigma method, which essentially rejects what it identifies as error. It works really well with lots of frames, and like crap with few frames. I use per-channel background calibration, because I find it to work better. The dark settings and bias settings are similar:
 |
| bias is set up the same way. |
You can safely walk away from the computer at this point, the stacking will take a few hours to complete, when you come back you'll see the result. Use gamma and stuff to "preview," but reset everything before export. Save it without any modifications as a 16 or 32 bit TIFF, unless you plan to edit in photoshop or lightroom (highly not recommended), in which case adjust gamma and saturation some here. If you plan to use those, you can stop reading. If you want to see (roughly) what I did in StarTools, read on.
 | |
| the very second thing you will see in startools. |
Not quite. Stacking does appear to have moved the fainter structures of M42 to be darker, but that's fine. Step one is to bin and perform a small crop, binning to 50% resolution to increase signal quality, and cropping to remove stacking artifacts from the borders. From there, we move on to the first pass of developing...
 |
| developing, pass 1. |
Ah, thar she blows! Because our data is faint, we apply a pretty intense gamma curve; 2.3 in this case, and we use a dark anomaly filter to ignore the background a bit when raising the gamma. From here, we do a wipe to remove the light pollution and darken the background. Problem is, it's easy to go overboard...
 |
| grab your glasses or view larger. |
 | |
| round two, might want bifocals. |
We remove the dark anomaly filter and turn down the aggressiveness a bit, effectively un-damaging some structures. After this we go back to the develop panel and tweak our gamma adjustment (redo the stretch, do not stretch as-is). From there, fret not, we intend to bring our fainter bits back out to play. We go into the HDR module...
 |
| Remember, HDR doesn't mean clown vomit. |
Normally, I would tweak this for a long time, but this is just for example so I didn't bother adjusting much. As you can see, we brought back a lot of the faint stuff. What's nice about StarTools is that it doesn't clip data in either direction, so everything can be fixed. Unfortunately, it is a linear editor and does not work with layers or anything like that, nor can you save part way through an edit, so you should make sure you like what you've done with every tool before moving on. Moving on, we go to the life module:
 |
| a mask should be used here, without one we can only increase contrast on the object itself. |
Normally, we use Life for two purposes. The first, to brighten the core area as you can see, increasing contrast and making it a bit prettier. The second is to lift the object from noise, but without a mask that part tends not to work. Making a mask would take far longer, so I haven't in this example. Before and after using the life module, I run wavelet sharpening. The first pass is weaker, the second, after life, is the default intensity. After that I adjust saturation and perform a crop.
 | |
| saturation goes a little like this for my example, but is never a standard treatment; every file is different. |
From here, we're almost done. This is actually after all my steps (oops, forgot a screenshot), which is also why the button upper right says "after" not before, I'm not showing it re-saturated, those are just the settings I used. Afer saturating, we turn to bullying noise. We go to the upper left, and click the green track button and when prompted, stop tracking and do final NR. From there, we crop and rotate as we wish to get the composition we want, and are pretty much done. If you want, you can not cap the green channel in saturation, get a way blue result, and then take this output into LR/PS and tweak the color, but I'd rather get it to 95% of what I want here and deal with it. My data started so faint there was little color anyway.
 |
| this is the part where you save. |
 |
| much cleaner. Masks will get you far. |
Total time stacking: 6 hours
Total time processing: 1 hour
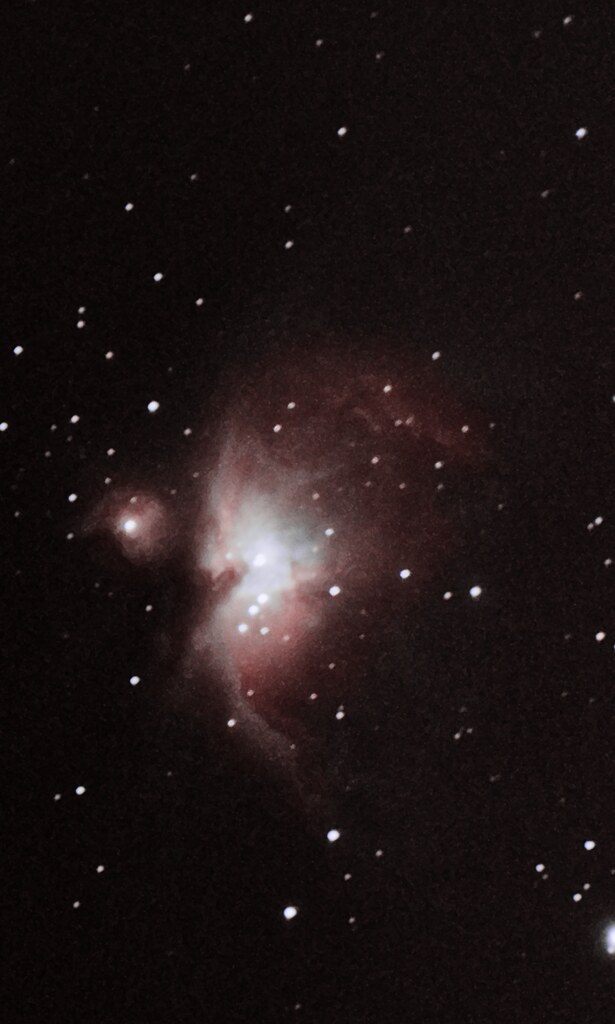
This result would be impossible to get from photoshop, the algorithms just aren't there. PixInsight is another piece of great software, but far more expensive than StarTools. However, it handles stacking and also contains far more tools. I don't need them, and would rather $60 StarTools than $300 PixInsight.
If you have any questions, there are lots of great people in /r/astrophotography and on the internet that are more knowledgeable than me, but feel free to ask.
Boy, that was a doosey, I think I'll get some hot cocoa now...
No comments:
Post a Comment